The Audience Mapping feature allows the administrator to target a group of users and training through the assignment of Domains, Users, and/or Rules. Administrators can then control users’ access to training and content in course catalogs, as well as assign and manage required training.
Examples of system objects that can be targeted through audience mapping include Learning Resources, Catalogs, Mapping Curricula, Portal Pages, and Home Page Announcements.
How it works
When a user logs into the LMS, the system will determine the resources and content that the user can view by comparing the audience definition of these objects to that of the individual. In this manner, the user is presented with a selected list of training resources tailored for them by their training community.
Audience definition methods
There are two ways to define Audiences - Domain-Based Rules and the Audience Rules Engine.
Each has it's own advantage as far as simplicity and flexibility.
Domain-Based Rules
Audiences are defined directly in the Audience tab of a Learning Resource, Catalog, Mapping Curricula, or other system object. This is the simplest and most direct way of defining an audience.
The audience is defined by configuring the Mapping box, using either Domains and/or a selected group of People.
It can be done on either the resource's Audience tab, or by assigning an Audience Template to that Audience tab (see Creating an Audience Template).
The Audience Rules Engine
This feature allows administrators even more control to expand or restrict audience membership versus Domain-Based Audiences. This is the most powerful way of defining an audience, as it includes other Rules based on system data and events, beyond Domains and People. And, these Audience Templates can be reused multiple times and across various resources and areas of the LMS.
These Rules are implemented via the Audience Template feature. The admin creates an Audience Template with an Advanced Audience and applies it to an Audience tab (see Creating an Audience Template).
You can learn more in the Online Help section Creating an Advanced Audience Rule.
Below is a description of the base components used to manage audience mapping.
In the LMS, user data mirrors your organization's data structure. This is expressed in a hierarchy of domains, levels, and elements.
A domain is a type of data used to categorize users, such as "Job Title", "Business Unit", or "Manager/Not".
A level is a grouping of elements within a domain, such as "Sales" within "Job Title" or "East Region" within "Business Unit". A level is used as an extra layer of granularity in between the broad data type of a domain and the specific value of an element. Not all domains require levels to sub-divide them.
An element is one value within a domain, such as "Sales Manager", "East Region Sales", or "Yes-Manager".
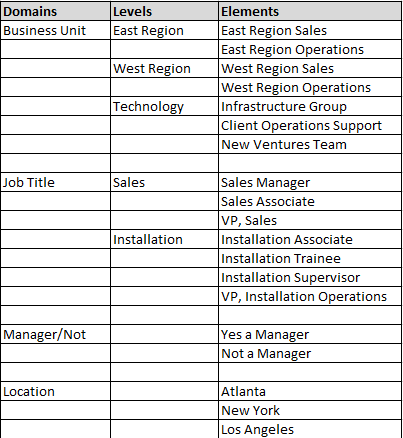
Below are some sample domains, elements, and levels for a fictional organization.

The LMS will create and populate domain data when processing the data feed from your organization's data source.
As departments, job codes, and the like are added to or dropped from the source system,
the LMS will automatically stay in sync with these changes.
Each LMS user must appear in one element of each domain that is defined in the system.
An audience for a learning resource, curriculum, or home page announcement is a set of people that is described by elements or levels in one or more domains. Audiences are assigned to courses or curricula to make these items visible or required for members of the audience.
It is important to note that audience membership can be affected by the date and time that a user receives assignment to a domain.
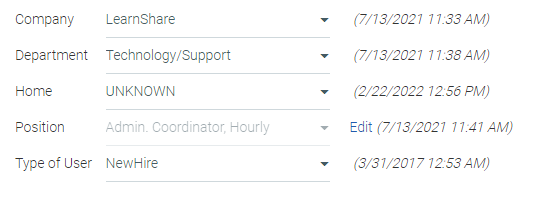
The dates and times of domain membership can be viewed by pulling up the user's profile through People > Maintain People and Security through the Navigation Menu of the Administrators's Console.
Audiences can be defined by:
The LMS default is to include all specified elements and to join multiple domains with an "AND".
The related resource audience (where it applies) can be found on:
Use this screen to map a resource to a defined target audience.
There are two methods for creating an audience - Domain-Based Rules and the new Audience Rules Engine.
The Domain-Based Rules method lets you define an audience(s) based on domains and people, directly in the audience tab in the resource, or applying an Audience Template to that tab.
The Audience Rules Engine, using additional data beyond domains and more complex rule options gives the administrator further flexibility in managing learning assignments, and is managed through Audience Templates.
For an overview of audience mapping, see About Audience Mapping.
Below are separate sections below for using either Domain-Based audiences and the Audience Rules Engine.

Use this tab to determine which administrators can see the resource to edit it, include it in Catalogs, Certificates, and Reporting.
Proper configuration of the PRIMARY tab and its mapping are critical to the visibility and use of the resource.
Domain Mapping should be considered carefully so that the right administrators can see and manage the resource and so that the resource is restricted from those administrators who should not.
This section defines whether the resource is required or optional, and controls when the resource appears to learners' Development Plans, and how the resource enrollment status appears for that learner in Reporting.
When this method is used, there is no system generated notification to inform users that this course was placed on their development plan.
When this method is used, Required Notifications must be used to inform users of this requirement. No “generic” enrollment notification will be sent, as is sent when a learner is enrolled by themselves, a manager, or an admin.
It's an LMS best practice to use only "Default. Optional Activity" on the Primary Tab.
Although Optional Activity in Development Plan and Required Activity in Development Plan are available in the PRIMARY tab, the PRIMARY tab's function is to control the overall visibility of the resource to learners and administrators - NOT to specify required training. These options should only be used in the PRIMARY tab if the company administrator is confident that visibility for this resource should be limited to most administrators, not visible in Catalogs, and used exclusively for required training.
To specify required or optional training to be assigned to learner's Learning Plans - create a new, secondary audience and select one of the "in Development Plan" options.
For this reason, Requirement Options are discussed below in the section Add Secondary Audience.
For details on how to use and edit the Domains and People sub-tabs, see Audience tab: Domains and People.
The Add Audience button at the top right of this screen allows an administrator to create additional audience tabs, at the same level as the Primary tab. This can be used to push the course out to a smaller, targeted audience. For example, a subset of the primary audience may be required to complete the course early, or the expiration requirement might only apply to a specific audience.
To add a secondary audience, click the Add Audience button. A pop-up box will display.
If this is a new audience that you will be creating, use the default “new audience” option. Enter a title, and, if desired, a description of your new audience.
If the audience you are adding is going to use an audience template, select the “from audience template option.” Begin typing the name of the audience template in the smart filter box and select the correct template as it appears.
Click Update to save your changes. A new audience tab has now been created based on your selections.

Now, set up the audience requirement options.
Specify Course Options Optional Activity in Development Plan or Required Activity in Development Plan.
Then configure Requirement Options and Expiration Options.
REQUIREMENT OPTIONS
Effective Date
Enter the date that the requirement will take effect. Users will not see the training before this date. If no date is selected, the effective date will default to the date that the audience was created.
Due Date Type
Some selections from this drop-down menu will cause additional fields to appear. The following due date types are available:
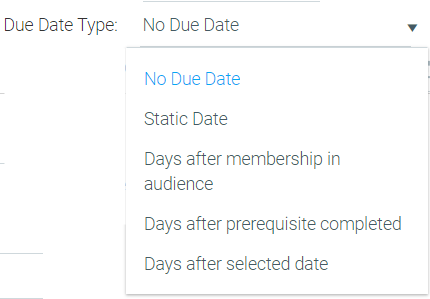
This section sets a due date for the audience, and how it will be calculated.
Regardless of the type of due date selected, assignments become overdue at midnight on the due date. You cannot complete an assignment on the due date and it still be considered on time.
For example, if you have an incomplete assignment due on December 31st, you would need to complete it before December 31st for it to be considered on time. Completion on December 31st would cause the assignment to be classified as overdue.
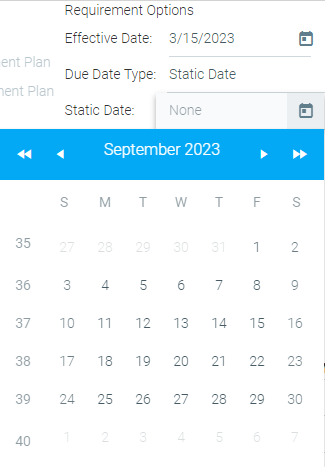
If you choose Static Due Date and a domain value for the audience, any new users who join that audience on or after the Static Due Date would immediately be Overdue/Past Due. As a result, these users could receive a Past Due notification before they receive a Notice of Required Learning. For learning that will be required for new users, it is best to choose the Days After Membership in Audience due date type.
Example: Training is assigned to the Technology/Support Department to be completed by 6/30/2021 (using Static Due Date Type). The user below joins the Technology/Support Department on 7/13/21. Because of the use of the Static Due Date, this user will already be considered Past Due on their first day in this department.
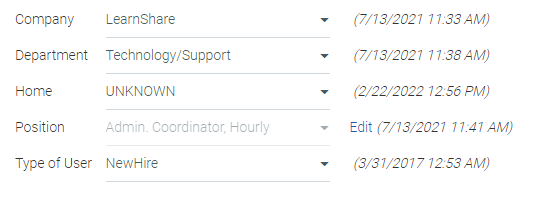
The dates and times of domain membership can be viewed by pulling up the user's profile through People > Maintain People and Security through the Navigation Menu of the Administrators's Console. The specific dates and times that each domain was assigned are pictured to the right of the domain.
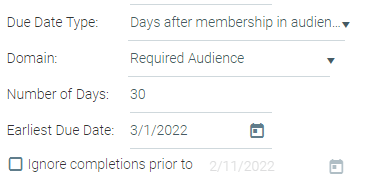
Most of the time, the domain requirement should be Required Audience. This will ensure that the user always receives a due date that is correct relative to their joining the required audience.
Select Ignore completions prior to and specify a date to tell the LMS to ignore completed courses before a certain date.
Select Ignore completions prior to and specify a date to tell the LMS to ignore completed prerequisite courses before a certain date.

As the prerequisite course is completed, the required course will show on the Learner’s plan (unless the effective date of the requirement is in the future). Even if the due date is well into the future, the course will appear immediately on the learner’s plan.
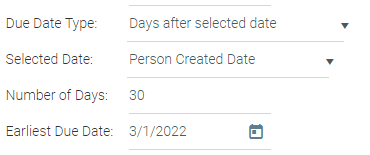
Most of the time, the domain requirement should be Required Audience. This will ensure that the user always receives a due date that is correct relative to their joining the required audience.
Select Ignore completions prior to and specify a date to tell the LMS to ignore courses completed before a certain date.

When using mapping curricula, Takes Precedence will still be an option for individual courses. However, when you set the option for all of the courses in the mapping curriculum, or for all courses in one level of the mapping curriculum, the Takes Precedence option will not be available.
This feature is opt-in only. Please contact the Support Team to have this feature enabled for your organization.
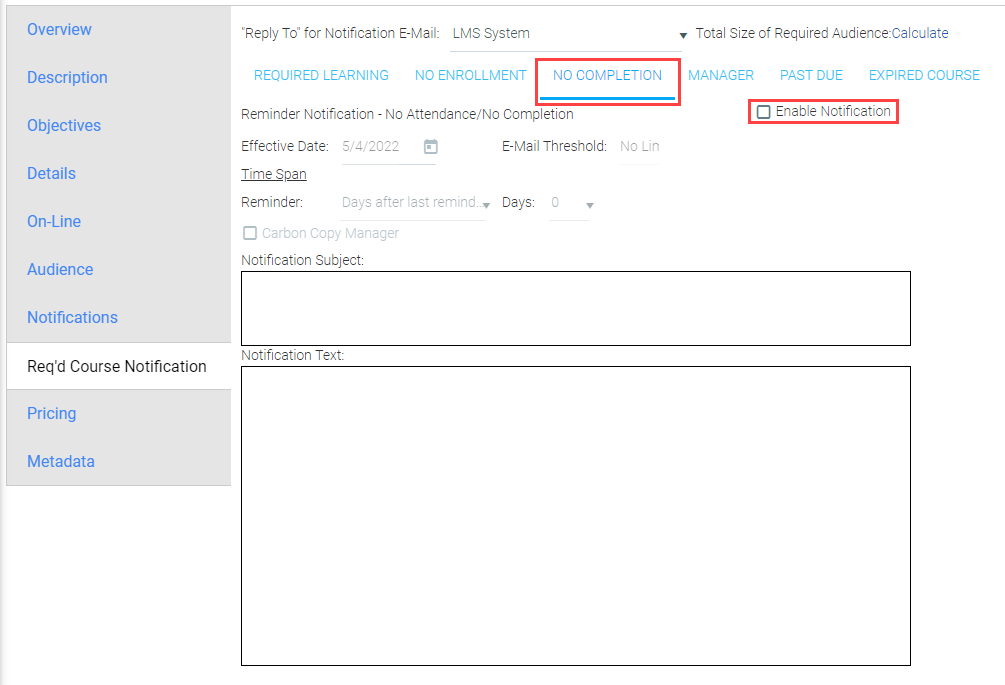
Checking this box will prompt a reminder pop-out box to appear. This is because it is critical to remember to set up the 'No Completion' notification on the Required Course Notification tab. By default, users will only receive one automatic Required Learning notification for the resource, unless the tabs are set up differently by the administrator.
An issue has been found in LearnShare that could potentially cause training due dates to be earlier than expected. This can happen when a learning resource or mapping curricula audience meets the following conditions:
In this scenario, the due date will be calculated based on domains, but not other criteria in the audience. We will soon release an update to ensure that users are warned before saving any audience that meets these conditions. A future release will ensure that due dates are calculated correctly for any audience that meets these conditions.
Use Expiration if learners need to periodically retake the course.
This is often used when learners need to repeat a course yearly, for example, to be re-certified in a skill or to show compliance with a business practice.
Expiration can be thought of as recurring Required Training and as such, you can also use some of the Required Notifications as reminders.
Below is a description of Expiration Options and how you can use them to drive recurring required training.
![]() Expiration Options are available on the Primary audience tab, as well as any other added Audience tab.
Expiration Options are available on the Primary audience tab, as well as any other added Audience tab.
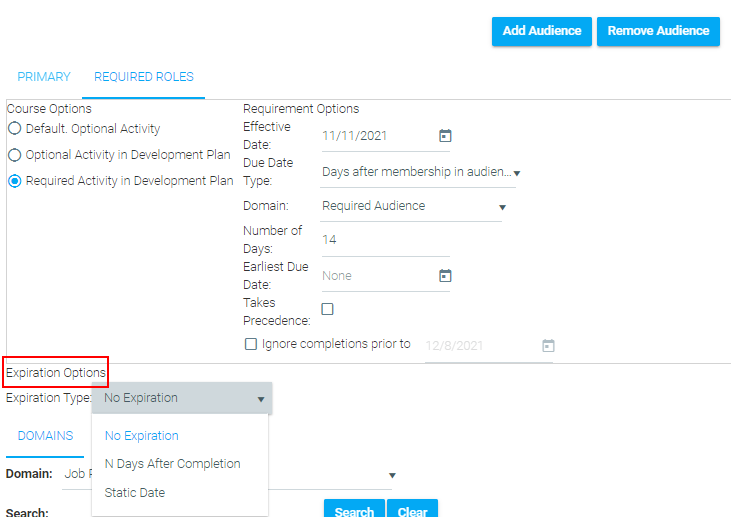
The default setting is No Expiration. To enable Expiration, choose one of the Expiration Type options from the drop-down.
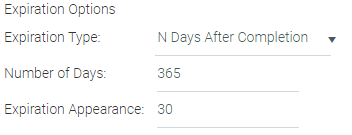
The option N Days After Completion will require the learner to complete the course, again, N days after the previous completion the learner had with that course. Because Expiration repeats, the previous completion could be the initial required training completion or a completion that was required by a previous Expiration. In any case, this option bases the new completion based on the LAST completion that learner had in the course.
The Static Date option simply allows you to set a fixed date that the learner needs to complete the course again, with the new completion deadline not tied in any way to the last completion. For example, admins can use this when all new hires are required to complete a business code of conduct course, but all employees will need to re-take it at the end of the year, regardless of the date of their previous completion that year.
Expiration Type: N Days After Completion
Expiration Type: Static Date

The Expiration Appearance also indicates when the window of time opens for a user to satisfy the training requirement. In the above example, the user will not see the training appear on their learning plan until December 1st, but also any course completions prior to December 1st will not count toward this requirement. The user must complete the training between December 1st and December 31st for it to be considered on time.
Other Notes
When expiration is set on the Primary tab, users in the primary audience who completes the course (originally required or not) will be required to complete it again when it expires.
If expiration should only apply to a select group of users, use the Add Audience feature to create a targeted audience and set the expiration on that targeted audience tab.
Scenarios for Due Dates and Expiration Dates
Scenario 1
Results for Scenario 1

Scenario 2
Results for Scenario 2

Scenario 3
Results for Scenario 3

AUDIENCES BASED ON AN AUDIENCE TEMPLATE
If the new audience was created based on an Audience Template, the domain drop-down and people options will be grayed out. Audiences created using an Audience Template reflect the current audience as dynamically defined in the Audience Template. If domains and membership have been changed SINCE the template was used to define the audience, that new audience is in effect. In other words, if there were 38 learners in the audience when the template was used to create it last month, and the administrator has now changed the audience template to include 300 learners, that new audience is now in effect for that audience tab in your resource.
If desired, you can change the name of an audience tab that is based on an audience template. Right click the Audience tab and a menu shows, with EDIT as an option. However, do this with care as there will be no other indicator letting you know what audience template the audience was based on.
If desired, you can break the template link - this allows you to modify the audience directly in the resource without changing the actual template. Right click the audience tab and a menu shows, with BREAK TEMPLATE LINK as an option. Once you do this, you now have complete control of the audience, in your resource. However, it also means that any changes made to the audience template originally linked to this audience, will no longer be dynamically applied. This audience tab now has no relationship to the original audience template. To break the template link, right-click on the audience tab and select Break Template Link.

OTHER CONSIDERATIONS
If desired, you can change the name of an Audience tab. Right click the audience tab and a menu shows, with EDIT as an option.
Use the Remove Audience button to permanently delete an audience.
If you remove a required audience, the course will automatically be removed from all Learning Plans where it has a Not Started status. If an enrollment has an Incomplete status, the course will remain on the user’s Learning Plan even though the requirement has been removed.
If a user is a member of multiple required audiences for the same resource, the resource will only appear on their Learning Plan once. The nearest due date will be listed as the user’s Completion Deadline.
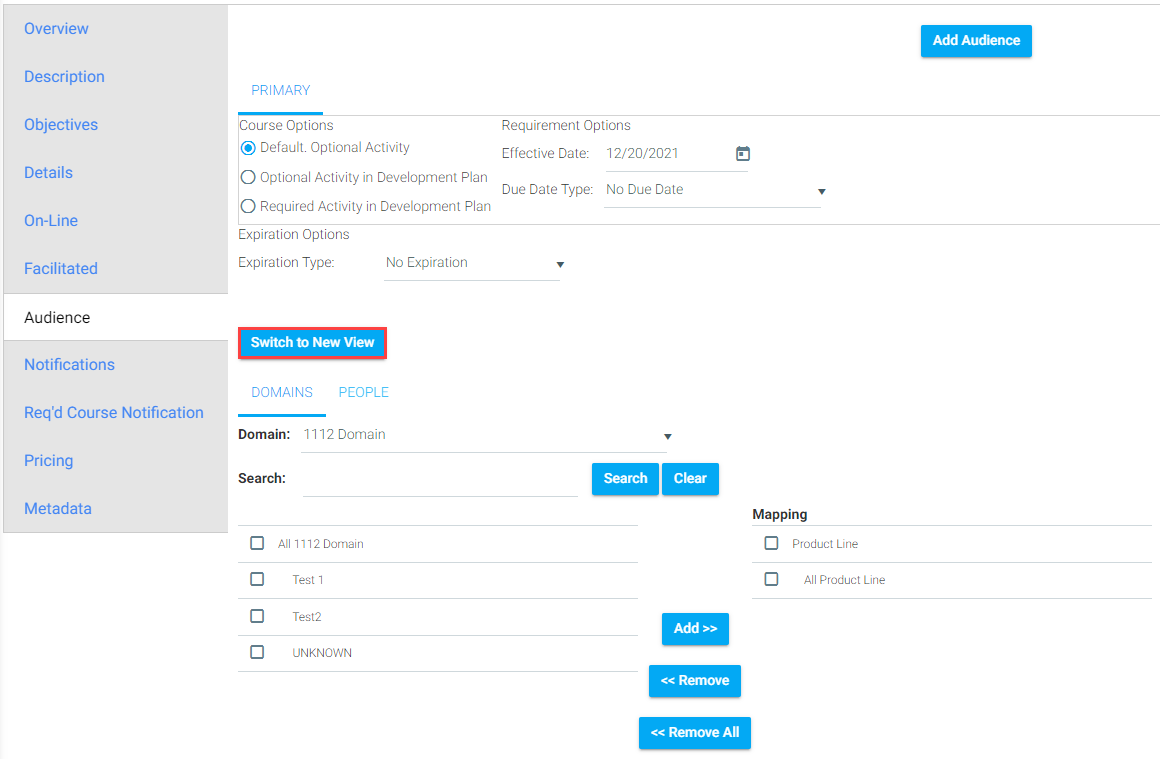
A new set of tools and UI (User Interface) is available to make it easier for administrators to apply advanced audience rules to learning resources - at the same time greatly increasing the power and flexibility of building audiences by adding additional learner data beyond domains, such as hire date, as well more complex rules.
To access the new UI, click the Switch to New View button from the Audience tab.
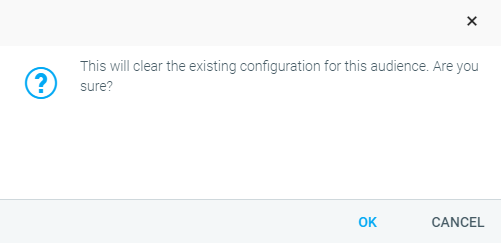
A pop-up box will appear to confirm that you wish to switch to the new view. If you have made any changes using the old view of the Audience tab, they will be deleted when switching to the new view. Click OK if you wish to proceed to the new view. Click Cancel to remain in the old view.
After switching to the new view, you will see the following screen with the new Audience Rules Engine.
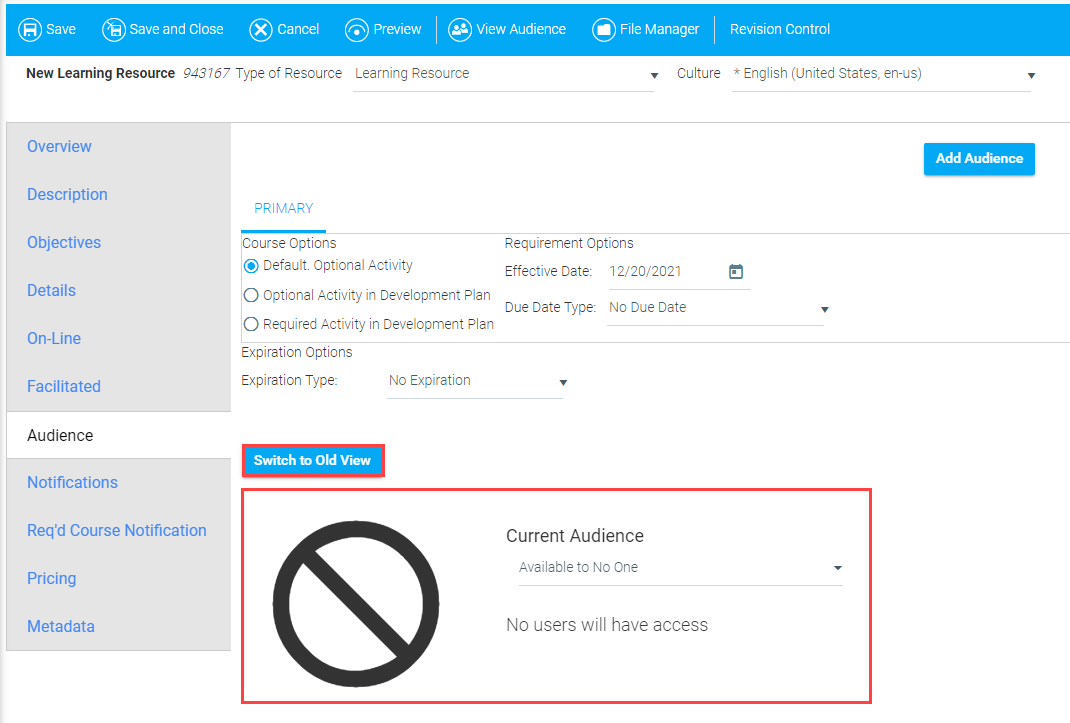
The new Audience Rules Engine allows administrators to create audience rules for each learning resource by making the audience available to everyone or no one, or by creating and utilizing simple or advanced audience rules. For instructions on creating audience rules, see Creating a Simple Audience Rule and Creating an Advanced Audience Rule or visit the Using Audiences section of the Online Help.
You can revert back to the old view by clicking the Switch to Old View button.
Within each audience under the Audience Tab there are two sub-tabs for defining the domains and adding individuals to an audience.
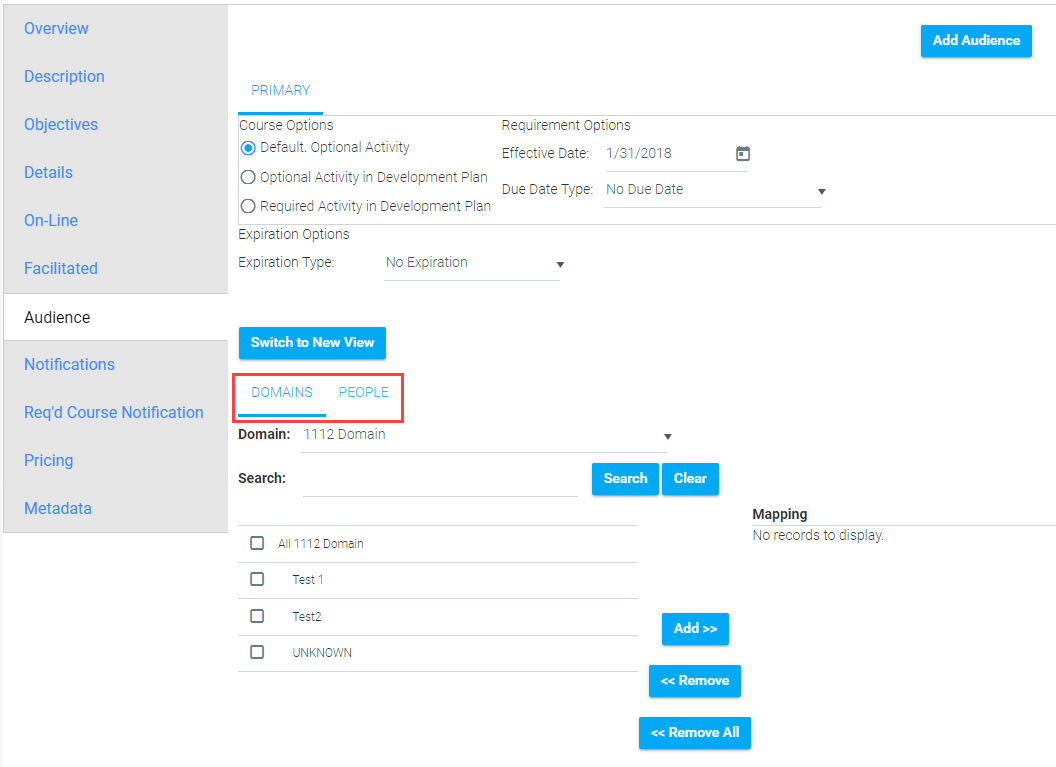
A domain is a type of data used to categorize users, such as "Job Title", "Business Unit", or "Manager/Not". On the Domain sub-tab, you can select all the domain categories that your audience consists of.
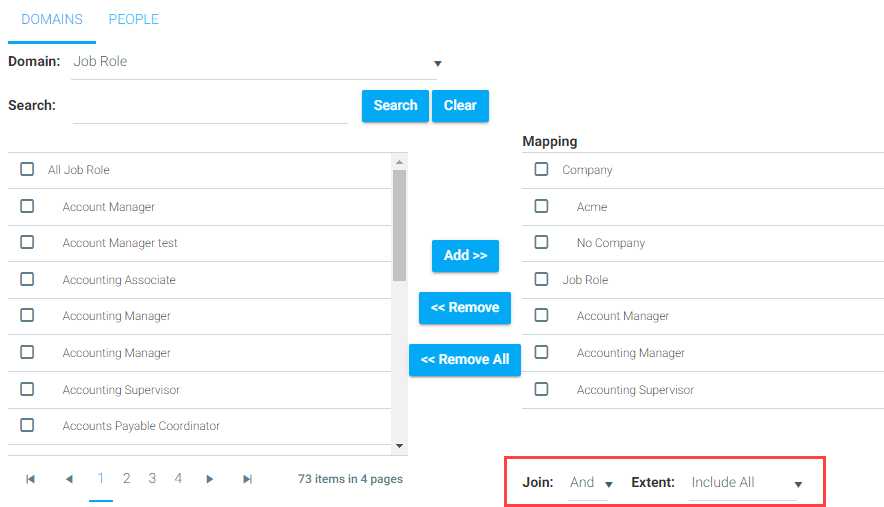
You can select domains using the Domain drop-down list, the Search field, or by browsing the full list of domains. When you have selected the domain(s) you want, click the Add button in the middle of the screen. The domain(s) you selected will appear in the right-hand Mapping panel.
Below the right-hand Mapping box are the options for how multiple domains should be joined together. You will need to select an option for both the Join and Extent fields.
The People tab can be used to add individual people to an audience that may not already be included in the domains you selected, or to exclude individuals within a domain you selected. The People Tab can also be used for all audience mapping, allowing an administrator to create a “hand-picked” audience that is not reliant on domains.
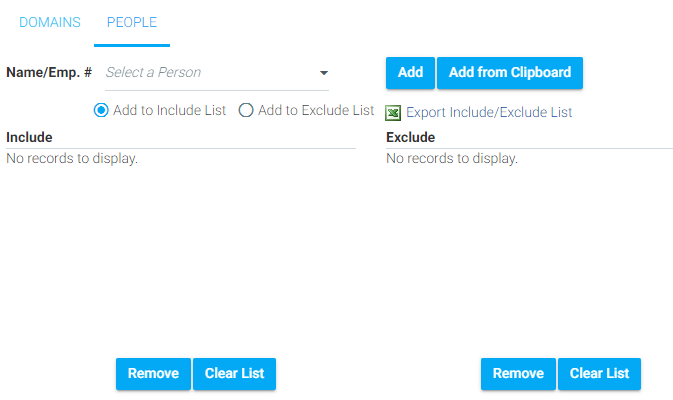
To add people, enter the person's last name or employee number. Their name will automatically appear in a drop-down, as you type. Select the correct name, and click the Add button. By default, the name will appear in the Include panel. To add a person to the Exclude list, select the Add to Exclude List radio button, before you click Add.
To remove names from the list, select the check box next to the name and click the Remove button, or click Clear List to start completely over.
You can also add users from a previously saved Excel or text file.
Click the Add From Clipboard button to call up a pop-up window.

Select one of the following options:
Click Next to continue.

Select the type of data that will be used, and select what separates the data. If all of the data is in a column or row in Excel, leave it at the “Tab” default. Click Next to continue.

Paste the selected data onto the clipboard and click Next to continue.

The system will alert you to any data that it could not read. If there are any errors, correct the data in your source document, then click the Previous button to re-paste the information. When all information is correct, click the Finish button.
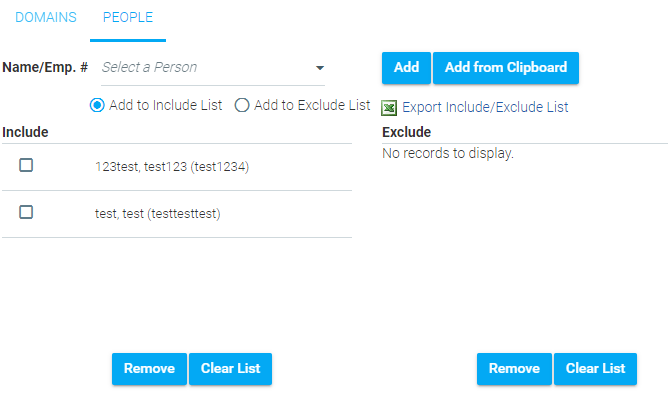
The names that you pasted on to the clipboard will now appear on the screen.
There are links on the audience tab that can be used to see the Count of audience members and exactly who is in the selected audience. They are helpful as you are constructing Domain and People Mapping.
Using these tools as you build an audience tab, before it goes live, is very important to use to confirm that you will have the correct learners as members in this audience. You can confirm that you've targeted all of the right learners, and also prevent unintentionally including (and even requiring) hundreds or thousands of the wrong learners - before you save the resource and make the requirements active.
At the bottom right of the Audience Tab settings, there are the following links:
At the top right of the People sub-tab is the Export Include/Exclude List link.

When you click on this link, you will see a pop up box. Click on the link “Click here to open the file” to open the Excel file. Clicking OK will close the window without opening the Excel file.
The View Audience button is available in the Maintain Learning Resources screen toolbar.
This takes you to the same pop-up as the View Audience link on the Audience Tab. This pop-up includes:
On the Audience tab, below the domain mapping area, there is a list of any curricula and/or certificates of which this resource is a member. This is an important tool and the one spot for the admin to know what Catalog(s), Mapping Curricula, or Certificates the resource is a member of.
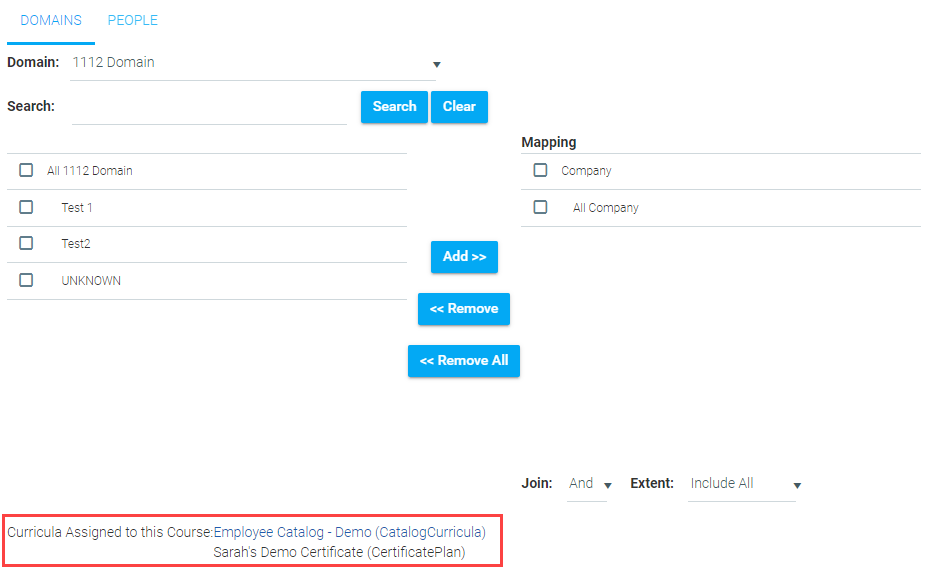
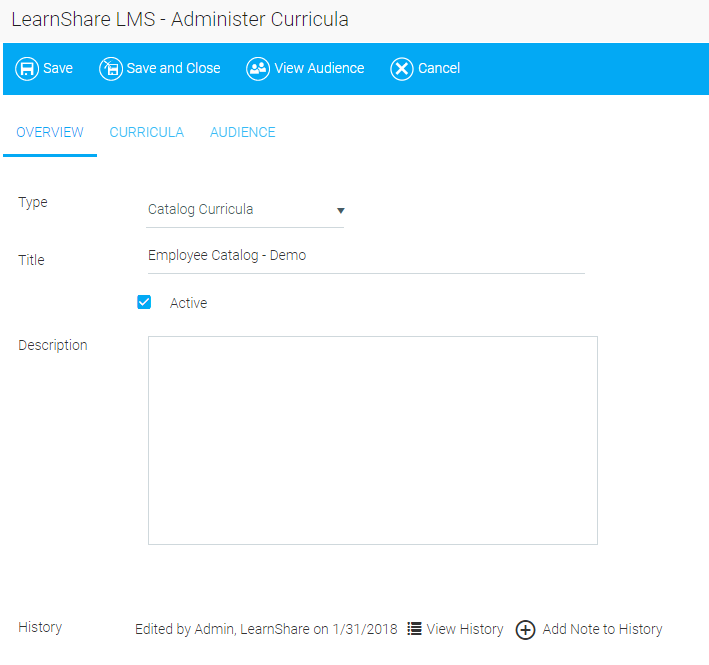
Some of the listed curricula (Catalog, Mapping) are shown as links.
Clicking the link will pop-up the curricula for view.
To learn more about how to use each tab, select from the list below or from the Help navigation tree.
To learn more about creating audience rules, select from the list below or from the Help navigation tree.